지난번 글을 통해 소켓을 통한 알림기능 구현을 결정했다.
알림 기능 프로세스
결정 후 가장 처음으로 한 것은 프로세스의 흐름을 이해한 것이다.
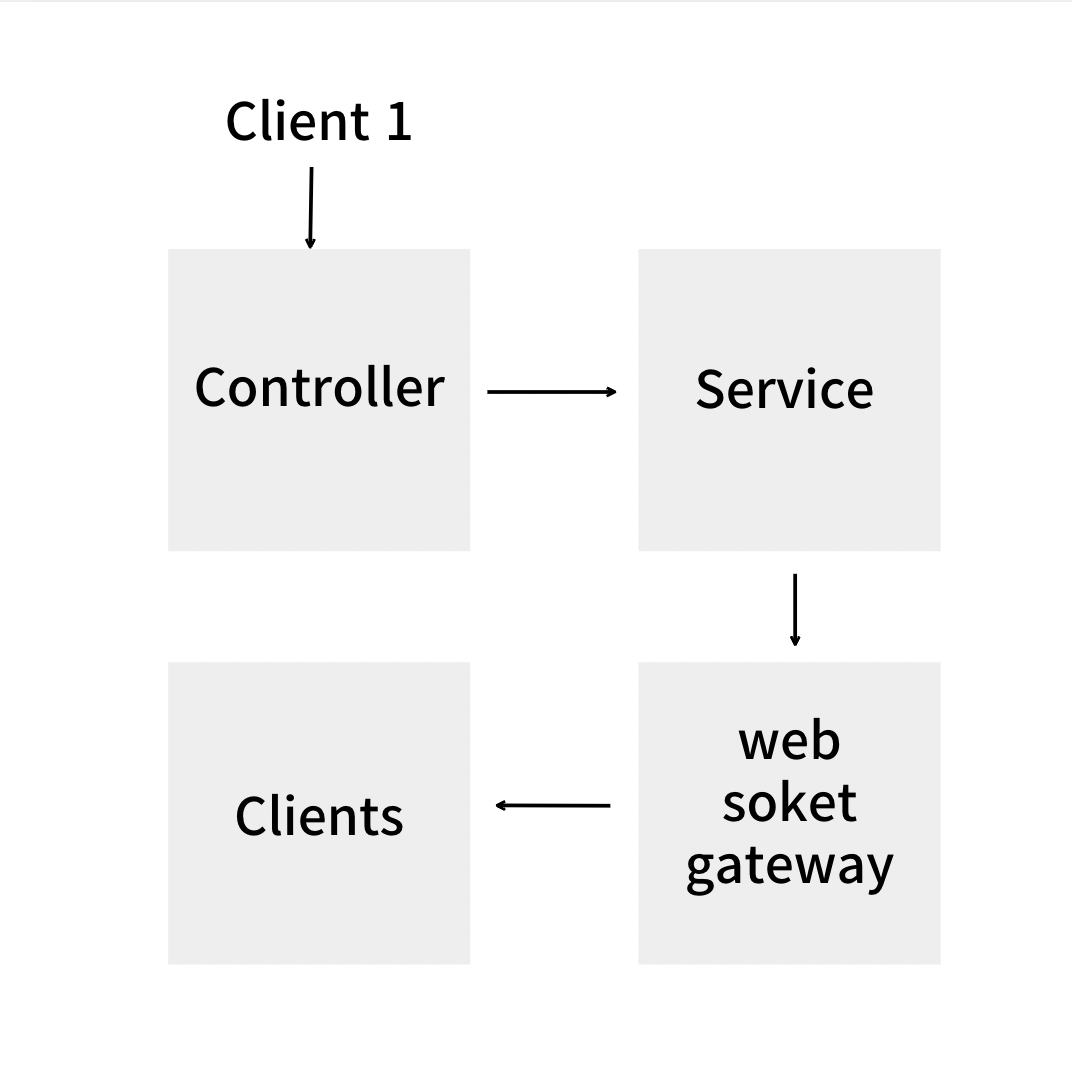
위 그림처럼 'client1'이 action을 하면 기존 흐름처럼 controller -> service로 동일하게 흘러간다.
service에서 비즈니스 로직 수행을 마친 후, 다시 controller로 반환해주기 전에 작성해준 websoket gateway코드를 통해 해당 action에 대한 알림을 client들에게 보내주는 흐름이다.
(소켓을 사용해 client와 server가 항상 연결되어있기때문에, 요청을 보내지 않은 clients들에게도 실시간 알림을 보내줄 수 있는것!)
알림을 주는 websocket gateway
그 다음으로 한 일이 알림을 전해주는 역할을 하는 gateway를 만드는 것이었다.
import { WebSocketGateway, OnGatewayInit, OnGatewayConnection, OnGatewayDisconnect, WebSocketServer, SubscribeMessage, MessageBody, ConnectedSocket } from '@nestjs/websockets';
import { Server, Socket } from 'socket.io';
import { NotificationsService } from './notifications.service';
@WebSocketGateway({ cors: true})
export class NotificationsGateway
implements OnGatewayInit, OnGatewayConnection, OnGatewayDisconnect {
constructor(private readonly notificationsService: NotificationsService) {}
@WebSocketServer() server: Server;
//이벤트 핸들러
//초기화
afterInit(server: Server) {
console.log('WebSocket server initialized')
}
//연결
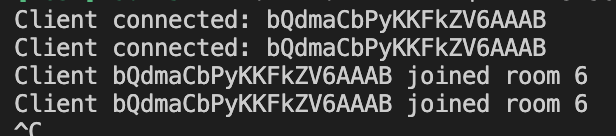
handleConnection(client: Socket) {
console.log(`Client connected: ${client.id}`)
}
//연결 끊김
handleDisconnect(client: Socket) {
console.log(`Client disconnected: ${client.id}`)
}
//클라이언트 참여
@SubscribeMessage('join')
handleJoinRoom(@MessageBody() data: { userId: number }, @ConnectedSocket() client: Socket) {
client.join(data.userId.toString());
console.log(`Client ${client.id} joined room ${data.userId}`);
}
//알림 보내고 저장
async sendNotification(userId: number, message: string) {
if(userId === undefined || userId === null) {
console.error('userId is undefiened or null')
return
}
console.log(`Sending notification to user ${userId}: ${message}`);
this.server.to(userId.toString()).emit('notification', message);
await this.notificationsService.createNotification(userId, message)
}
}WebSocketGateway 데코레이터를 만들어주었다.
- 사용할 메스드들을 구현해준 후,
- 생성자를 통해 알림을 데이터베이스에 저장하기 위한 NotificationsService를 주입해주었다.
- websocketserver 데코레이터를 통해, 서비 인스턴스를 정의해준후
- 이벤트 핸들러를 통해, 이벤트 발생시 각각 '서버 초기화', '클라이언트 연결', '클라이언트 연결 해제'가 호출되어 로그를 확인할 수 있게 만들어주었다.
- @SubscribeMessage('join')를 통해 클라이언트가 join 메시지를 보냈을 때 호출되도록 한다. (data 객체에서 userId를 받아, 특정 방에 join시킨다)
- sendNotification을 통해 client에게 알림을 보내는 로직 구현
- userId가 제대로 넘어온다면, 해당 userId에 함께 넘어온 message를 보내는 구조
- 그 후, userIdd와 message를 데이터 베이스에 저장해 추후, 알림 목록을 확인할 수 있도록해주었다.
WebSocketGateway 데코레이터 옆에 있는 'cors:true'는?
CORS는 웹 브라우저와 서버 간의 교차 출처 요청을 관리하는 보안 기능으로, 웹 페이지가 다른 도메인, 프로토콜, 포트에서 리소스를 요청할 때 브라우저는 보안상의 이유로 이러한 요청을 제한한다.
WebSocket 연결도 HTTP 요청을 통해 설정되어 CORS 정책이 적용됨cors: true 설정
NestJS에서 WebSocket Gateway에 cors: true를 설정하면, 모든 출처에서의 요청을 허용하게 되어 브라우저가 다른 출처에서 오는 WebSocket 연결 요청을 차단하지 않도록 한다.
즉, 이 설정을 통해 어떤 도메인에서든지 WebSocket 서버에 연결할 수 있으며, 특정 출처의 제한 없이 모든 클라이언트가 WebSocket 연결을 시도할 수 있다.
service 파일 원하는 기능에 gateway 코드 추가
    //카드 수정
    .
    .
    .

    await this.cardsRepository.update(
      { cardId },
      {
        title,
        description,
        color,
        startAt,
        deadline,
      }
    );

    const updatedCard = await this.cardsRepository.findOne({
      where: {
        cardId,
      },
      select: {
        cardId: true,
        title: true,
        description: true,
        color: true,
        startAt: true,
        deadline: true,
        createdAt: true,
        updatedAt: true,
      },
    });

    //수정 유저 이름 조회
    const user = await this.usersRepository.findOne({
      where: { userId },
      select: ['name']
    })
    if (_.isNil(user)) {
      throw new NotFoundException('유저를 찾을 수 없습니다.');
    }

    // 카드 수정 알림 전송
    for (const worker of card.workers) {
      this.notificationsGateway.sendNotification(worker.user.userId, `${user.name}님이 ${title} 카드를 수정했습니다.`);
    }
    return updatedCard;
  }
예시로 카드를 수정하는 service 부분을 가져와 보았다.
- 카드를 DB에 업데이트 되기 전 알림만 가는 경우를 방지하기 위해, 업데이트 후 알림이 반환 되도록 코드 위치를 결정하였다.
- 위 코드에 보이진 않지만, 카드를 가져올 때, 카드 할당자를 relations로 같이 가져와주었고,
- 알림시 action 유저의 이름도 같이 넣어주기 위해, 이름도 조회해주었다.
- 그 후, 해당 card의 relations로 연결되어있는 workers를 for문을 통해 하나씩돌아 카드에 할당된 worker 한명씩 알림을 받을 수 있도록 만들어주었다.
- 아까 gateway.ts파일에서 보았듯이 'worker.user.userId'가 메세지를 받는 userId 부분, 그리고 그 뒤는 message가 변수로 들어간다.
- 이제 notificationsGateway에 있는 sendNotification이 호출되어, 들어간 userId에게 message를 보내고 데이터베이스에 저장이 된다.
WebSocketGateway의 역할과 프로세스만 이해한다면 어렵지 않은 기능구현이었다.
처음에 생소한감이 있었지만 앞으로는 소켓을 이용해 재밌는것들을 많이 만들 수 있을 것 같은 느낌!
채팅기능부터 다양한 시도를 해나가봐야겠다.
'개발 기초 다지기' 카테고리의 다른 글
| DB 분할? (0) | 2024.07.22 |
|---|---|
| distinctAlias 문제 (쿼리 빌더) (0) | 2024.07.22 |
| 댓글/상태변화 알림 기능 구현 (왜 http 요청이 아닌 웹소켓인가?) (0) | 2024.07.12 |
| 보드 속 리스트 이동 (Linked List 다시 보기) (0) | 2024.07.11 |
| NestJS 서버 포트 충돌 문제 해결(기존 포트 프로세스 죽이기) (0) | 2024.07.10 |

댓글